Beef

COOKING -- SOME COMMONLY ASKED QUESTIONS

COOKING: SOME COMMONLY ASKED QUESTIONS AND ANSWERS

Q. What is meant by the term braising when cooking?

A. Braising is the use of moist heat to cook a less tender cut of meat. Adding no less than a half inch of water or your favorite liquid such as a broth and cover the container. Maintain a temperature of 325 - 350 degrees F

Q. Is braising done on the stovetop or in the oven?

A. Braising of meat can be can be done in a covered heavy pot or skillet either on top of the stove or in the over.

Q. Is browning the meat prior to braising required?

A. The meat can be browned on both sides if desired. A seasoned flour can be patted on each side of the meat. This browning will add some flavor and color. Finish cooking with moisture in oven or on the stove top.

Q. When braising meat, is covering the pan required?

A. Yes. This lid will keep the steam produced from the liquid in the pan and this steam will soften the connective tissue of the meat making it more tender. when the meat becomes fork tender, it is done.

Q. What is broiling of meat?

A. Broiling is the use of dry heat to cook meat. This method is best used to cook the more tender cuts of steaks and/or chops.

Q. Can any piece of meat be broiled?

A. Not just any cut of meat but the more tender steak or chop cuts broil best. However, some less tender cuts of beef like a flank steak or a top round london broil can be after marinating them.

Q. What is pan broiling?

A. Pan broiling is using a pan or skillet on top of the stove to cook the steak or chop without the use of liquid. Medium high to high is recommended temperature setting.

Q. Does the thickness of the meat make a difference?

A. Yes. When broiling in the oven the meat needs to be ¾ inch to 1 ¼ inch thick. However when pan broiling we recommend ½ inch to ¾ inch.

Q. What is stir frying?

A. Cooking thin slices of meat quickly in a skillet with a small amount of oil on top of the stove using medium high heat. Meat ¼ inch by ¼ inch approximately 3 inches in length is ideal. Add quick cooking vegetables and your favorite seasoning when meat is close to being done.

Q. What is roasting?

A. Roasting is the cooking of an uncovered piece of meat in an oven or similar appliance.

Q. What meat is best for roasting?

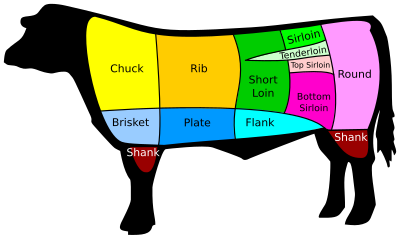
A. Use some of the more tender cuts such as beef rib (boneless or bone in), top round, sirloin tip, pork loin and fresh ham. Lamb as well as veal leg and shoulder cuts also roast well. Remember you should use a piece of meat that weighs more that 2 ½ lb.

Q. Should a rack be used when roasting?

A. Yes and no. The purpose of the rack is to keep the meat out of the drippings as the meat cooks and to allow air air to circulate around the roast. So, yes a rack is needed unless the meat has bones in it. Bones will raise the meat off the bottom of the pan and allow air to circulate around the meat.

Q. Should I cover the roast while it cooks?

A. No. Covering the pan with foil, or wrapping the roast with foil, or using a cooking bag is actually braising. Because we are using some of the more tender cuts, braising is not needed. Also, the browning of the exterior of the meat adds flavor to the roast.

Q. Should I season the meat before or after roasting?

A. This is personal preference. I personally like to season the meat the night before. I will rub the spices all over, cover the meat with plastic and place in the refrigerator. Be sure to unwrap prior to placing meat in oven.

Q. At what temperature should I roast meat?

A. Some feel that the oven should be set at a high, 375 - 400 degrees F for 15 - 30 minutes. Less time for a smaller roast. This higher temperature helps ‘seal” the outside to help hold the juices in. However, this high temperature will cause more cooking losses. We recommend roasting at 250 degrees F - 325 degrees F. The larger the roast, the lower the temperature. This lower temperature helps cook the meat at a slower rate and more uniform throughout. An over 8 pound roast needs this lower temperature to cook evenly.

Q. What is the difference between thermostat and thermometer?

A. A meat thermometer registers the temperature of the roast. The thermostat controls the oven temperature. Knowing that both are accurate is very important. You will need to know that the temperature the thermostat is set at is the oven temperature. The thermometer will also let you know how done the meat is.

Q. How do I know when the roast is ready to be removed from the over?

A. First you will need to decide how done you want it Following are some guidelines. Remember the more done the roast the dryer the roast as more moisture will be cooked out of the meat.

Rare 125 - 130 degrees F

Medium Rare 130 - 140 degrees F

Medium 140 - 150 degrees F

Medium well 150 - 155 degrees F

Well over 160 degrees F

You will need a stick thermometer, placing it into the center of the roast. Be sure that the end of the thermometer is not touching any bones. Bones will conduct heat faster than whole muscle meat. You will want to remove the roast from the oven when your thermometer registers about 7 - 10 degrees less than your desired final temperature. After the roast is removed from oven, place it (still in roasting pan) on counter top, cover with foil or maybe a clean cloth for 10 - 15 minutes. The roast will continue to increase in temperature the 7 - 10 degrees needed to reach your desired final temperature. This also helps the meat hold onto more juice -- thus making for a juicier cut of meat.

Q. How long do I cook this roast?

A. As we all know oven temperature will vary from oven to oven. And then to make things more confusing the roast size and type will affect the time. Also, does the roast have bones or is it boneless? These all affect the time. And don’t forget the beginning temperature of the piece of meat. But, with that said, a good rule of thumb that I like to use is 35 minutes per pound in a 275 degree F oven for an internal temperature of 150 degrees F.

Remember that the lower the oven temperature the less browning of the roast. The browning of the outside of the roast will change the flavor slightly. If you desire this than raise the temperature to 375 for the first 45 - 60 minutes and then drop the oven temperature to the 275.

Remember from your school day science class that water boils at 212 degree F. So why cook the roast at a high temperature and boil all the water (juice) out of the meat?

We have attached a link to a roasting chart that you may feel of benefit.

http://www.foodsafety.gov/keep/charts/meatchart.html

Remember, please feel free to post comments and questions.

sign up for our email list to be notified every time we post (about once a week).

Let's Make Buying Beef Simple

When we are at the grocery store standing in front of the meat counter and wondering what to have for dinner ---  all the different cuts of beef displayed confuse us so we just buy a package of ground meat and walk --- run -- away from this meat confusion.

Our intent with this writing is to help remove that confusion.   We plan to provide you with enough information that will allow you to walk the total meat case with confidence and purchase what you want and not just settle for "whatever".

THE FIRST IMPRESSION

Take a look around the total meat department.  Is it really clean, neat and does not have a lot of clutter?  Are the employees neatly dressed with hair covering and wearing plastic gloves?  Are you comfortable purchasing meat here?  You decide.

WHAT IS QUALITY BEEF

There are several definitions of the word quality.  The United Stated Department Of Agriculture  (USDA) has helped you by applying standards to beef.  These standards are assigned as different grades.  The top three grades are the ones you will most likely, and should find at least one of these at your local grocer or meat shop.  If there are no signs or labels telling you which one or ones are at your store -- then ask them. The age of the animal and the amount of marbling (intramuscular fat) are the two major factors that determine the grade assigned by the USDA grader.  For our discussion today, the top three grades are all close to within the same age group. Marbling is the major difference.  The top three grades are;

USDA PRIME -- has the most marbling of all the grades.  Most of this grade of beef is served at white table cloth restaurants.  This one will cost the most.

USDA CHOICE -- has a little less marbling than USDA Prime.  This is the most common beef sold at retail establishments. More than half the beef grades fall into this grade.

USDA SELECT -- Has less marbling than USDA Choice.  This beef will not have as much flavor as the other two grades.  Of the three grades, this one should be least expensive.

WHAT IS MARBLING

We have a love/hate relationship with this thing called marbling.  We love the flavor it adds to the beef but we are not fond of the calories it might add.  Marbling is the small flecks of fat within the muscle tissue.  This fat imparts flavor and juiciness in our beef and we all crave that flavor.  We may like the appearance of an all lean cut with little to no marbling but we really want that juicy flavor that those little flecks of fat impart.

Now that we know a little about the beef grades -- ask you grocer or meat person the grade of beef that they offer for sale.  Remember that USDA Prime will cost you more than USDA Choice while USDA Select will normally cost you the least.  This cost information is based on normal market pricing.  However, your particular store may run specials, so you will have to determine what you want.

YOU DECIDE 

Back in the good old days we might go to the local grocer or corner meat shop and tell "butch" behind the counter what we wanted.  He would pick out a good beef cut, maybe make a cooking suggestion and we would be on our way home knowing that the dinner we were about to prepare would be great -- cause "butch" had good quality meats and he knew what you wanted.

Today, we are not sure what we want, let alone how to buy it or maybe we are not sure how to cook it.  So, what should we look for when making our beef purchase. And -- where is "butch"?

EYE APPEAL IS  BUY APPEAL -- FIRST IMPRESSIONS -- WHAT ARE YOU LOOKING FOR?

You will want to look for a cut of beef that is bright red in color.  Look for those flecks of fat within that bright red muscle.

Look for that muscle to be moist in appearance.  Drying may start on the edges so pay attention to these.  Don't buy a drying out piece of meat.

Dark spots or a cut that is dark all over might mean the meat cutting area may have a sanitation issue.  On the other hand, some cuts like the sirloin and the filet mignon have a tendency to turn dark faster than other cut and not because of any sanitation issue.  Because of the leanness and structure the muscle fibers these two cuts have a tendency to lose their bright red color a lot quicker than other beef cuts. I have seen these cuts lose their "luster" within 6 or 7 hours after cutting.  Nothing wrong with these cuts that would make them turn from bright red but just the muscle structure. These would still be considered "fresh cut" but bottom line, be cautious of meat that is not a bright red color and moist in appearance.  After all you worked hard for that money you are about to spend.

SO WHAT'S FOR DINNER

We are on our way home from that hard day at work and need to stop at your market for dinner and guess what --- you have no idea what you are going to have.  To help you decide you should think about a cooking method.   The cooking method is determined by where the cut comes from.  Meaning, from what section of the animal did the cut come from?

Let's keep this simple.

Generally speaking, as we look at the diagram of the beef above, the front end (chuck, brisket and shank) and the back end (round and shank) will require a moist heat or require a marinade that will tenderize these muscles.  Why?  Because this beef animal weighs over 1,000 pound and these front shoulders and hind legs carry this heavy weight around and are almost constantly in motion as the animal walks .  It takes a lot of muscle to do this.

The more these muscles work,  the thicker the muscle fibers become and the less tender these muscles become.  A moist cooking method and/or a marinade helps reduce the thickness of these muscle fibers and thus the meat becomes more tender.  Let's continue to keep it simple and know that moist heat and/or marinade work on the end cuts to make them more tender.

Let's list a few of the cuts from these two areas.  Looking at the diagram above we see the round as one of those areas that would get a lot of work.  From this hind leg (round) we might see in our meat case the following that can be displayed as steaks or as a roast:

Full cut round, top round, bottom round or eye of round

Referring to the list above, we see the front end consists of the chuck and brisket.  Some of the cuts we might find displayed in your meat case would be:

chuck steak/roast, shoulder steaks/roasts, brisket roast

I have listed a few of the names of the cuts that you might find in your meat case from these less tender but very flavorful cuts.

Now remember that for the most part these cuts will need moist heat and a little longer to cook than the middle meats such as Rib eyes, strips,  t-bones or porterhouse steaks.  So, if you are in a hurry, please try to avoid these "end cuts" from the chuck and round.  However, remember these are normally less expensive cuts so a little planning on your part will save you some money.  And remember these will have some great flavor.

If you need proof of this, a foolproof cooking method would be to purchase a chuck roast and place in your crock pot with some onions, carrots, and potatoes and some broth or water.  Let cook until meat is fork tender and enjoy.

Other moist cooking methods would be braising, steaming/stewing, or simmering.  All require the use of some form of liquid.

Remember, we are trying to keep this simple.

Not all the end cuts need cooked in a crock pot as some such as the roasts from the round could be cooked in the over but I would recommend cooking at a low temperature (250°F), placed on a rack on a cookie sheet and covered.  Put a half a cup of water in the cookie sheet. This low temperature will require more time to cook the roast but will have less tendency to dry out the meat.

Can you remember from science class the temperature that water boils?  212° F is the boiling point of water so I ask you ---  why crank the oven up to a high temperature and boil all the moisture out of the meat? So let's keep the temperature low for a moist and tender piece of meat.

Now lets take a few minutes and talk about what is commonly called the middle meats.  After all, when you look at the diagram above, we have already talked about two ends of the animal -- the round and the chuck, so the items that are the rib, the short loin, the sirloin and the tenderloin are what are called the middle meats -- between the two ends.  They are located on either side of the backbone.  These muscles do not get the work that the end muscles do, so they will be more tender.

So our cooking method for these less worked muscles can be a dry heating method.  Roasting, broiling, grilling, or even pan frying are considered some dry cooking methods.

When you are standing in front of your meat case, some of the names on the packages from these cuts are;

Rib eye steak or roast, strip steak, tenderloin steak, t-bone steak and porterhouse steak, sirloin steak

The rib eye steak or roast is one that may have a little more marbling and has great flavor.  The rib eye muscle is a continuation of the same muscle that is in the chuck.

The strip steak is a continuation of the same muscle as the rib eye.  As you look at the diagram above it is located in the short loin section.

The tenderloin is underneath the strip and sirloin sections but has part of the vertebra separating it from the strip/sirloin.  Remember, we are going to keep this simple -- so just remember that this tenderloin muscle does very little work and is rated as the most tender muscle in the beef animal.  This is reflected in the price.

The T-Bone and Porterhouse come from the short loin.  They are made up of the strip and the tenderloin along with the vertebrae bones.  This bone is in the shape of a T -- thus T-Bone steak. Told you we would keep it simple.  The only difference between a t-bone and a porterhouse is size of the tenderloin.  A good rule of thumb is that if the tenderloin is smaller than a golf ball, then it will be a T-Bone.  If bigger than a golf ball, then it will be a Porterhouse.  Technically it is 1 1/4 in. is the measurement that differentiates the two.  But really, the muscles are the same.

Sirloin steaks are as you can see from the diagram located as the hip area.  This muscle does a little more work the the other middle meat muscles and may not be as tender as, let's say the rib eye.

 Remember that where the piece of meat comes from determines the cooking method.

Remember the names of the end cuts as on the diagram above and plan your cooking method accordingly.  Just because the label makes reference to steak.

I hope you will enjoy only the freshest, most flavorful meat after reading this!

sign up for our email list to be notified every time we post (about once a week).

The Freshest of Burgers

DSC_0246
DSC_0246

So, you want the freshest hamburgers you can get.  And you want to make sure you are serving a quality meat product to your family or guests. So here's how to make delicious and cost-effective hamburgers that everyone will enjoy. 

Our local grocery had a sale on chuck roasts, so we bought two nice size roasts that weighed about 3 pounds each.

 As you can see they are well marbled (specs of fat through out the muscle) roasts and would be great as roasts but not today.  We are planning steaks and hamburgers.  Yep, that’s right - steaks from a roast.

The chuck roast comes from the front shoulder of the beef animal and is made up of many muscles. One of the muscles is the same muscle that makes up the rib eye steak.  Most all of us love a good beef rib eye steak.  Well this “chuck eye”  is the same flavorful muscle except it is a little smaller and is still quite tender.

As you can see in the picture below it doesn't take much to remove this chuck eye from the roast.  We pull with our hands as there is a natural seam between this chuck eye and the other muscles of the roast.  We do have to do some cutting and in just a few minutes we have removed the chuck eye.

Our next step is to cut this chuck eye into two steaks. When I purchased our roasts I looked for ones that were at least two inches thick.  This made our chuck eye two inches so that when we cut it in half we will have two steaks that are one inch thick.  Perfect for the grill or the broiler.

So once the chuck eye has been removed we turn it up as you see in the picture below which will allow us to slice it into two individual steaks.

Now remember we had two roasts, thus two chuck eyes that made the 4 chuck eye steaks you see here.  These will broil up nicely for Sunday dinner.  We will just need a little minced garlic on them about two hours prior to cooking and then some salt and pepper.  We want to enjoy that great beef flavor these have to offer so we hold back on the spices.

Next we need to cut the rest of our roasts up into small enough pieces that they will fit into our Kitchen Aid grinder.

As you see by our next picture we have our steaks cut, our meat chunked just right for our grinder and we removed a little bit of fat as we were cutting up our chunks. So now, let’s grind.

We will grind the meat two times.  This mixes the lean and fat better.  Our first grind will be through our more coarse grinder plate, the one on the left.  The one on the right is our fine grinder plate and we’ll use it for our second grind.  The grinder knife, pictures in the middle will be used for both grinds.  

The secret to grinding is to make sure that you constantly keep meat moving through the grinder as both the knife and the plate are metal that are in contact with each other.  And the grinder on the knife is going round and round on the grinder plate.  Metal rubbing metal causes heat.  So keep the meat moving to avoid this heat build up.

As you see in our next picture there is a noticeable difference in our first grind and then the second.  

The one on the right has been ground two times.  This product looks so lean that one might think it is ground round but we all know it is ground chuck.

As I mentioned earlier, the steaks are for Sunday dinner but its Saturday night and that means it’s hamburger night.  Fresh tastes best and this freshly ground chuck really has a very fresh beef flavor.

We had ours with bacon we cured and smoked last weekend.  It was delicious.

And now for the second best part -- Saving money

Remember, we bought these roasts on sale.  They cost us $18.88.

We got 3 ¾ lb. ground chuck and 1 lb. 15 oz. of steaks.

If we would have gone to the market and bought the steaks and the ground chuck (that looked like ground round) we would have spent $26.86.  So we saved $7.98.

And we had a lot of fun making a quality product for our family.

If you have any questions, comment below!

sign up for our email list to be notified every time we post (about once a week).